Using a Dining Chair in the Office – One Room Challenge {week 7}
Using a dining chair in the office
“Thinking outside the box”……this is so often my decorating mantra. And my dilemma today fits in this category.
But before we get started, in case you missed anything…
week 1 | week 2 | week 3 | week 4 | week 5 | week 6
*Affiliate links used below. See full disclosure here.

I needed an office chair for my new craft room and art studio.
What’s the first thing that comes to mind when you think of an office chair? Probably some sort of ergonomic chair on wheels. And that’s exactly what I had in mind, too. Unfortunately, I couldn’t find anything that seemed like it would look right in the space, be functional for my needs, be reasonably priced, and be attractive.
Then I got to thinking, “why do I need an ergonomic chair on wheels?” I’m not going to use it like a regular office chair. I won’t be sitting in it for 8 hours a day. And there’s no need for me to go rolling around the room!
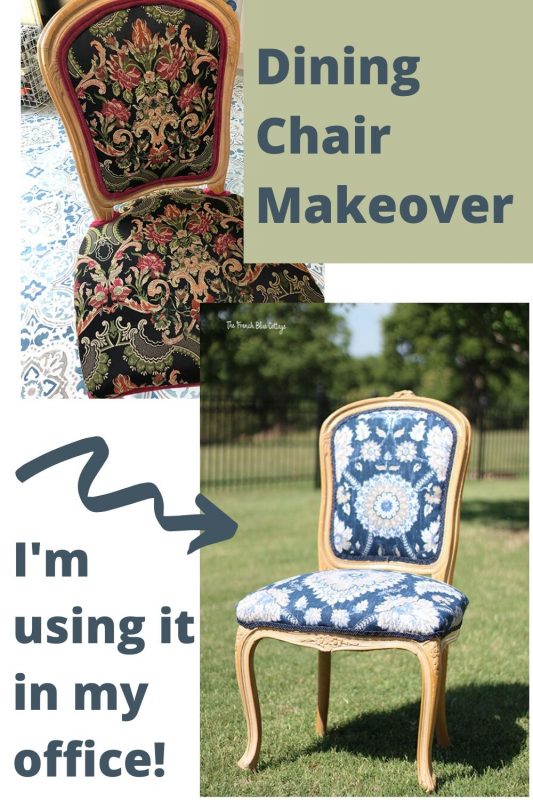
Fortunately, I found just what I needed and it was right in my dining room. You see, I bought a set of chairs at an estate sale about a year ago. It was one of those “can’t pass it up deals”.
But I did not sell my first set and now I have a plethora of dining chairs in two different styles. I grabbed one of the new ones and set it in my studio and it looked like it was meant to be. Who says there’s a problem with using a dining chair in the office?! Not me:)
The size looked right in the room, it’s functional and very comfortable, it didn’t cost me anything extra, and the style was attractive. It checked all the boxes…..
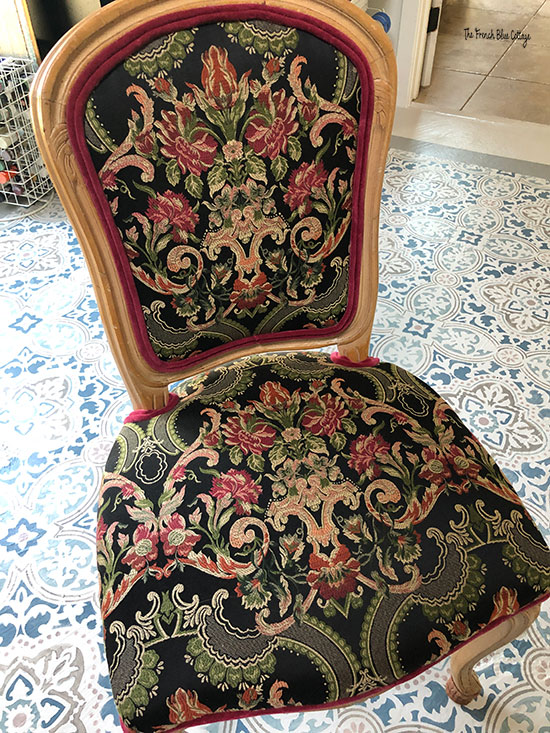
All except for the hot pink and black fabric.
I had previously ordered fabric to recover these chairs from a site called OnlineFabricStore.net.
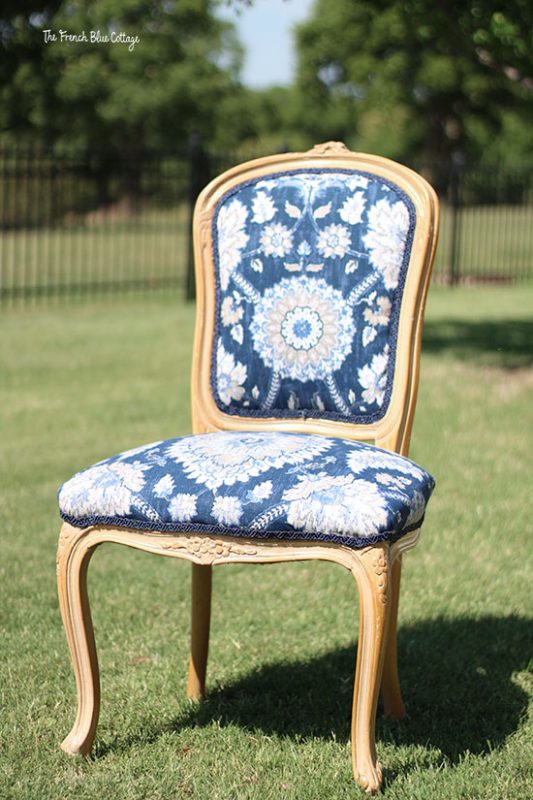
Luckily, the fabric looked great in both the dining room and in the office. There’s something to be said for having a color or two that you use throughout your home. If you’ve seen the rest of my rooms, then you know that for me, that color is blue.
Now I needed to buckle down and reupholster a chair.
Re-covering the dining/office chair
Truthfully, this is not my favorite job. I sew and upholster occasionally because it’s helpful for my budget and honestly, I usually have something very specific in mind that I want but can’t typically find it ready-made.
At least it’s not a wingback chair!
The first thing I did was to remove the old fabric and use the pieces as templates to cut out the new fabric.
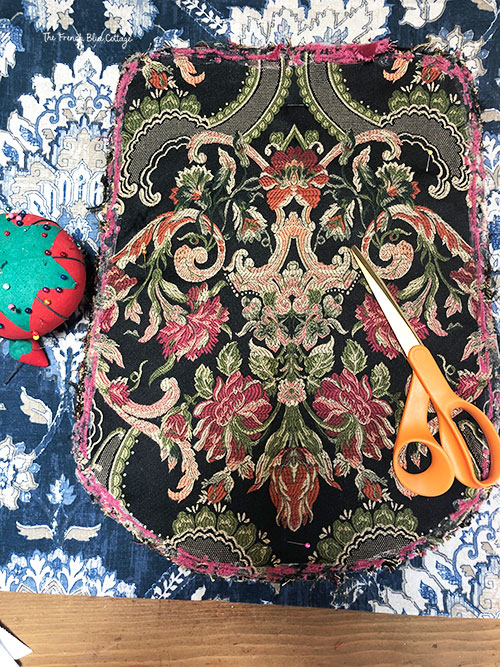
I know some of you might cringe because I’m ripping off this high-quality fabric. It really is very nice fabric….thick and embroidered. But I just can’t live with hot pink and black. It looks totally out of place in my home.
So I’m replacing expensive fabric that I don’t like with less expensive fabric that I do like. ?
No turning back now!
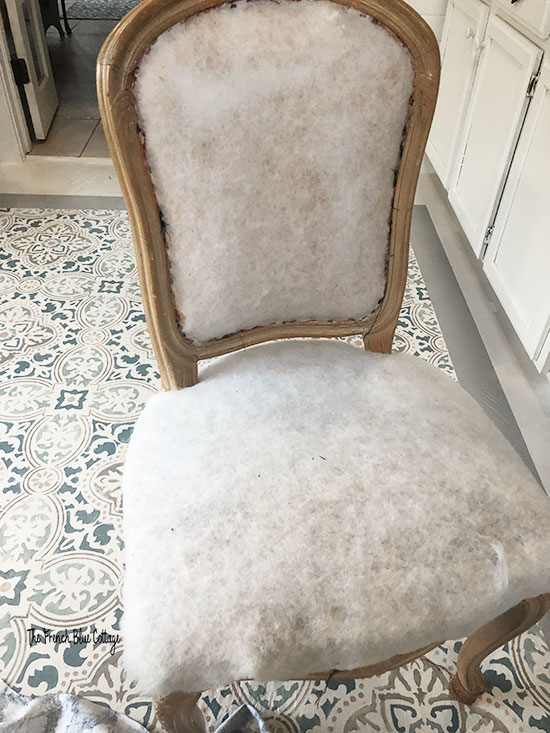
While removing the old fabric, I could tell that the chairs had been re-done professionally at some point. The batting underneath looked brand new.
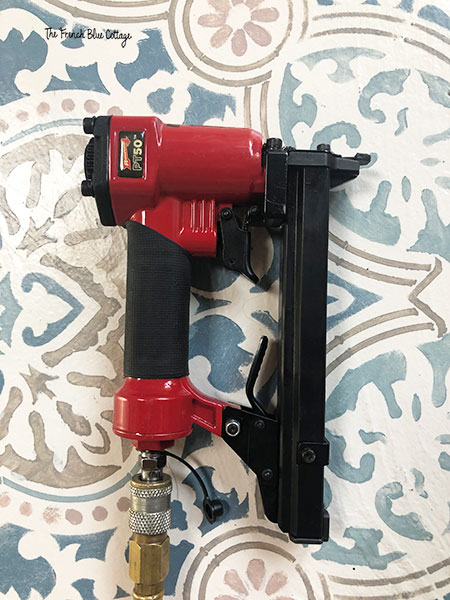
I used this pneumatic stapler to attach the new fabric. Here’s another staple gun option. If you don’t have a compressor, you could even try something like this electric upholstery gun.
You really need an upholstery gun like this if you are going to do more than one chair. It’s sooo much easier than using a hand-held staple gun. I’ve used both and there’s really no comparison.
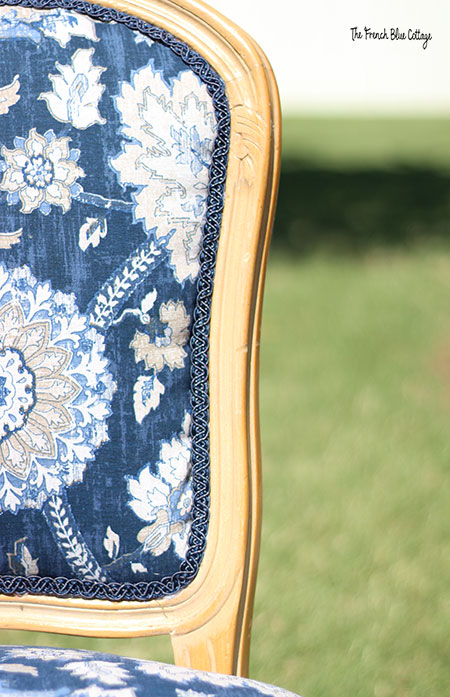
After I attached the fabric, I needed to cover the staples. The chair was previously trimmed with hot pink double welt cord. This time, I used this navy blue gimp trim to cover the staples and now the front is done!
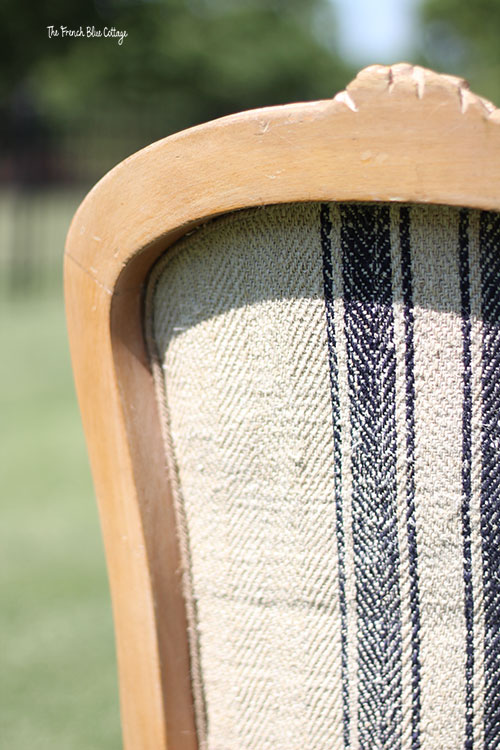
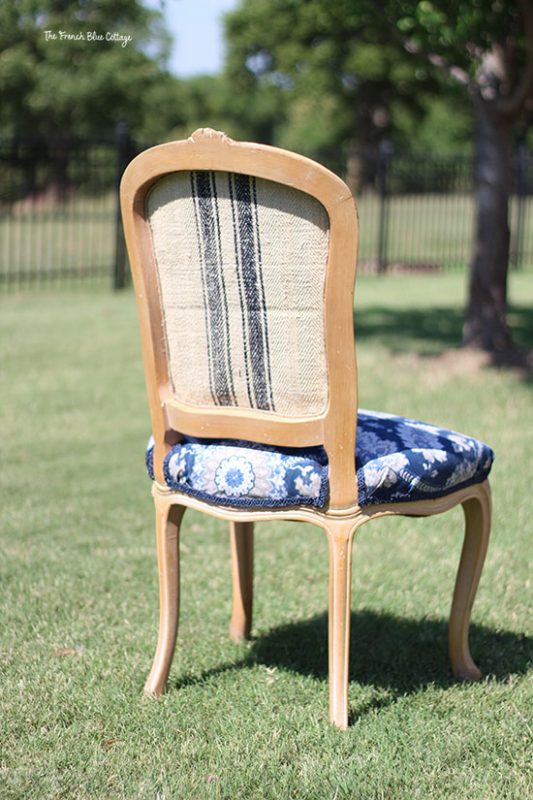
I also wanted a different fabric for the back of the chair seat….an added detail to make things more interesting.
There was a thick burlap sack that had just been sitting on top of a basket in my living room. And I thought it would be perfect.
I decided ahead of time that I didn’t want to completely re-do the chair back, so I would need to cover over the hot pink velvet instead of removing it. Because of this, I also had to choose a trim to go around the inside back edge. And I thought it would look best if it blended in with the fabric, so I chose a narrow jute rope trim….
It’s pretty rare for me to leave wood furniture alone. Usually, I end up restaining or repainting just about everything. In this case, the chair frames are pretty neutral. So, for now, I left them as is. I can’t guarantee that they’ll stay that way, though! ?
In addition, in order to protect the painted floors, I put some of the same “socks” on the chair that I used on my pine table.
I really love how the chair turned out!
Now I need to get busy recovering the other 5 dining chairs! ?
The one tool I did not have when reupholstering this chair was a pair of angled scissors for trimming the fabric after stapling. I’m definitely going to buy a pair of these angled scissors or these scissors before I tackle the other chairs.
![]()
Using a dining chair in the office definitely saved me some money. But I also wanted to save a little more of the budget by building some DIY art ledges.
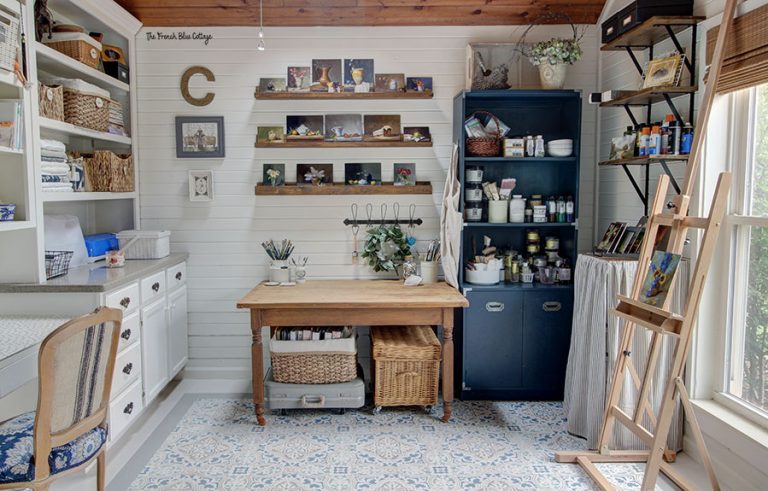
Building the art ledges
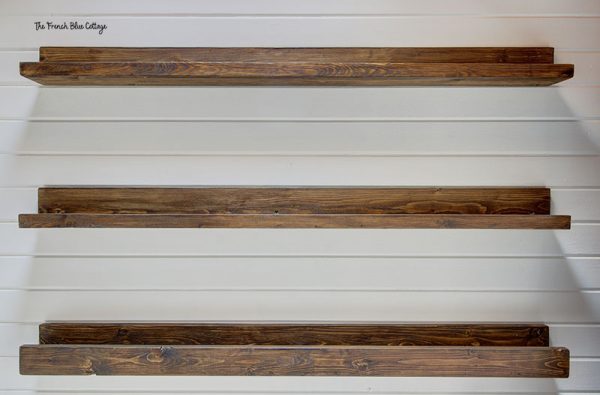
My husband cut some pine boards and attached them together to create these U-shaped shelves.
The back piece of each shelf is 3.5 inches high. The bottom piece of each one is 2.5 inches deep. Each shelf is 4 feet long.
After he put them together, I lightly sanded them and gave them a coat of water-based stain.
Then we hung them to the wall. The walls in this room are wood, so it was easy to attach the shelves with screws. On a sheetrock or plaster wall, you would need to find the studs.
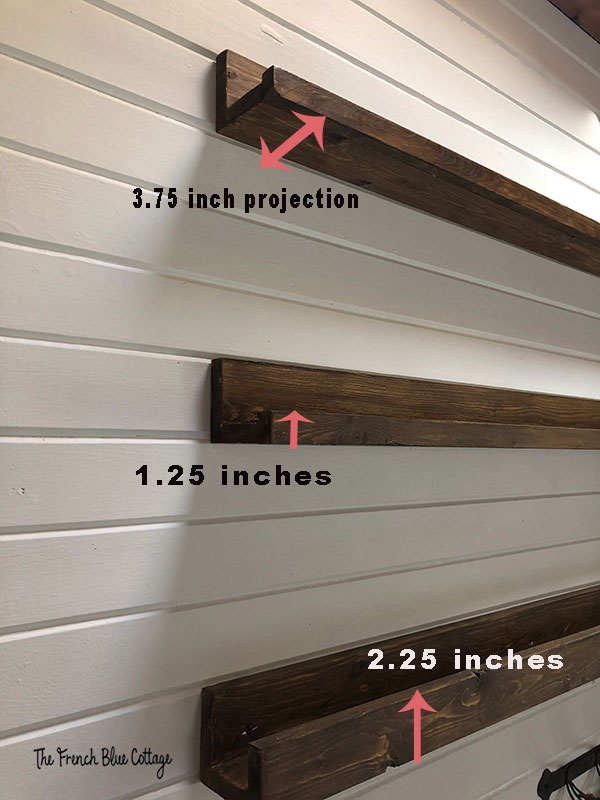
Here are the depth and the front lip dimensions of the shelves. The top two shelves have the same front lip height, while the bottom one is a bit taller. We did this because I couldn’t make up my mind about how high I wanted them. ?
The bottom shelf, with its taller front edge, might be better suited to larger art. But in the end, I prefer the look of the top two shelves. All three shelves have the same depth (the projection off of the wall)…..
The purpose of these art ledges is to have a place to display my oil paintings and to be a visual reminder to myself of how I’m progressing. I’m a beginner at oil painting and have been taking online classes for a few months. Here are the shelves styled with one of my paintings.
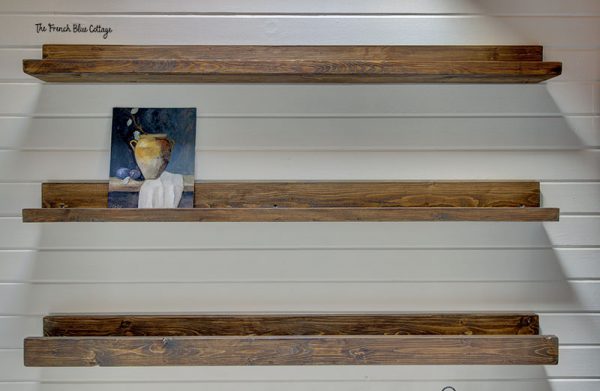
This is just a sneak peek. I filled the shelves with my paintings and they really look good en masse.
These shelves were super inexpensive, but they pack a big design punch in the room. I’m very pleased with how they turned out.
Art and Crafting Studio To-do List:
paint walls and (possibly) ceiling (decided against painting the ceiling)paint colorful, stenciled concrete floorre-paint desk areaaddress lighting and ceiling fan (give it a DIY makeover!)order window shade(install shade)find and buy a pine table(refinishing pine table)figure out storage needs, buy baskets that fit, & then organizebuy office chair (used a dining chair in the office!)decide on a rug (I love the floor so much, that I’m not adding a rug!)make art ledges- make open shelves
get new cabinet hardwarecover plastic storage drawersfigure out oil paint storage- decor items
![]()
Have you found any other makeovers to follow on the One Room Challenge site? You can check them out here.

I hope you come back next week, when I finally show the full reveal of this craft room and art studio!


Wow! I love the chair! I like the new material better than the old upholstery because it fits with my decor as well. Can’t wait to see your final reveal!
Thank you! Yeah, hot pink and black just wasn’t going to cut it with my other decor:)
The fabric you used for reupholstering this chair is gorgeous! I love the end result and it’s going to look great in your new office. The wall shelves are going to be great for displaying your paintings as you work on them. You are doing such a great job with this project and I’ve enjoyed your weekly updates.
Thanks, Paula! Things are moving right along and I sure appreciate you for following along with me:)
Your chair looks absolutely beautiful! I just love this style and I love the mixture of fabrics! I have a large bergere chair I really need to get done but upholstering is such a big job. But Oh So Satisfying when done!
Thanks, Kristen! Yes! Upholstery is one of those jobs I put off, but sure enjoy the results when it’s finally done:)
I LOVE the new fabric you chose… and using the grain sack on the back is perfect too! What a great dining room chair makeover, Carrie! Can’t wait for the reveal!
Thank you, Julie! I sure appreciate you for following along:)
Oh wow those chairs turned out amazing!
Thank you! It looks better to me, too:)
I love the dining chair for the office, I use one in mine too and it is the most comfortable chair I have ever had, which is key! I love the fabric you chose to create your masterpiece it is beautiful!
Thanks, Jen! Yes, comfort is key! Luckily, this one is now pretty and comfortable at the same time.
I have a dining chair in my office too! I love how yours came out! And those art ledges are so cool! Can’t wait for the reveal!
Thank you , Denise! I really appreciate you for following along with all of these projects:)
Carrie, that fabric is beautiful! What an amazing transformation! I love the grain sack on the back, too. I’ve really enjoyed your arts and craft room journey. Can’t wait to see the reveal!
Thanks, Rebecca! The chair, with its blue fabric, is so much more “me” now:)
I love the fabric you used for your chair and can’t wait to see the final reveal. I am revealing mine a few days late due to shipping issues of a couple items.
Thanks, Sonya! Looking forward to seeing your reveal, too. I know the shipping issues have really put some people behind schedule.
You did an amazing job! I love the fabric you chose. I have never reupholstered a chair, but you have inspired me.
Thank you, Lynne! This chair really wasn’t too bad. If you stick with a simple dining-type chair to begin with, you’ll find it goes pretty quickly.