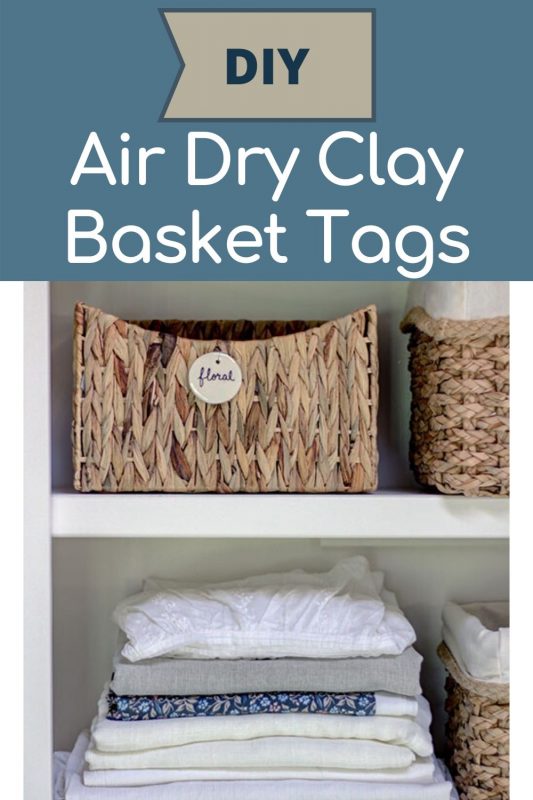
Air Dry Clay Tags – One Room Challenge {week 5}
Air Dry Clay Tags
![]()
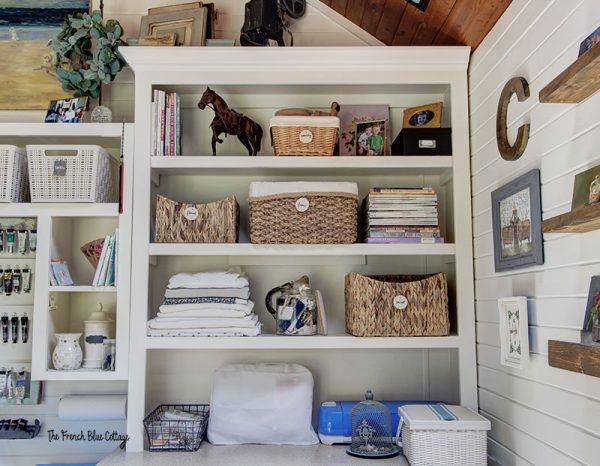
Today, I’m showing you how to make air dry clay tags. I used them to label the baskets in my new art studio/crafting room. This is going to be a well-used and functional room, but there’s no reason that I can’t have some pretty organization, right?
Welcome to week 5 of the One Room Challenge! In case you missed any of the other progress, you can catch up here….
Week 1 | Week 2 | Week 3 | Week 4
“Cleaning and organizing is a practice, not a project.” – Meagan Francis
This is probably true. But today we’re going to make a DIY project to help us with the practice of organizing!
Some affiliate links used below. See my full disclosure here.
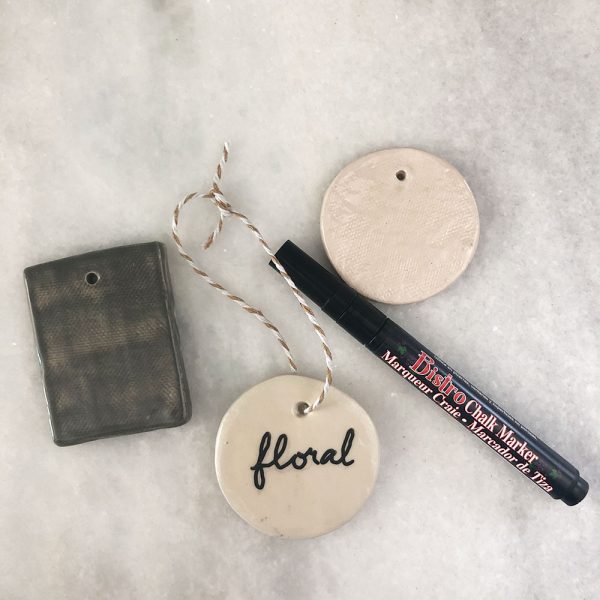
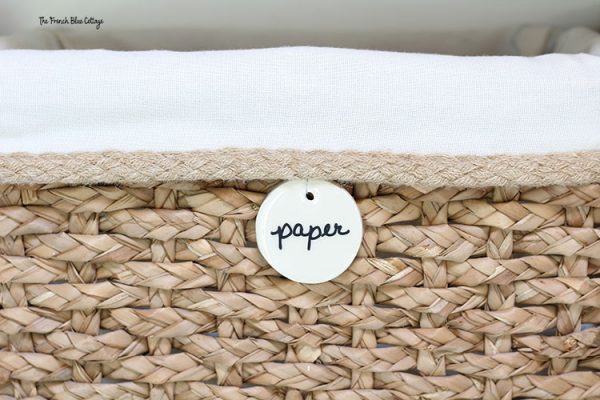
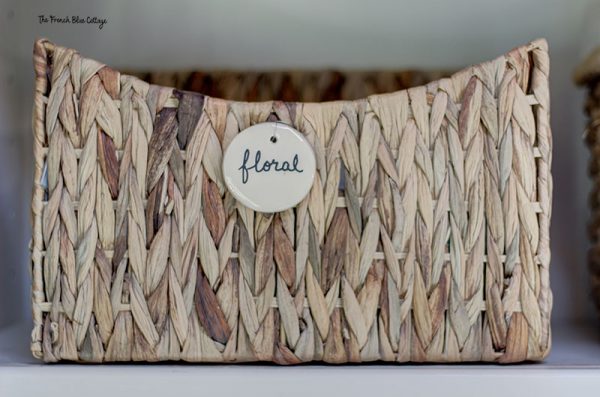
It all started with these ceramic tags (the top two in the photo above) that I made from kiln fired clay several years ago. I cut the tags from the clay and took them to my local ceramic shop to have them fired. After the first firing, I went back to the ceramic shop to glaze them. And finally, they were fired again to complete the process.
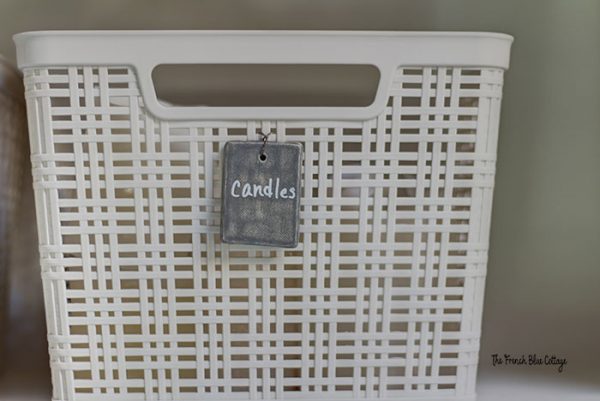
I ended up making some circular and some rectangular tags. Here’s what the rectangular clay tags look like on a basket…
These tags have been sitting in a drawer just waiting for the perfect opportunity to come out and organize something! This room renovation, with all of its baskets of supplies, proved to be the perfect place.
Unfortunately, I did not make enough of them for the number of baskets in my new space. And since I have not been able to get out and about recently, it limited my opportunity to make any extras.
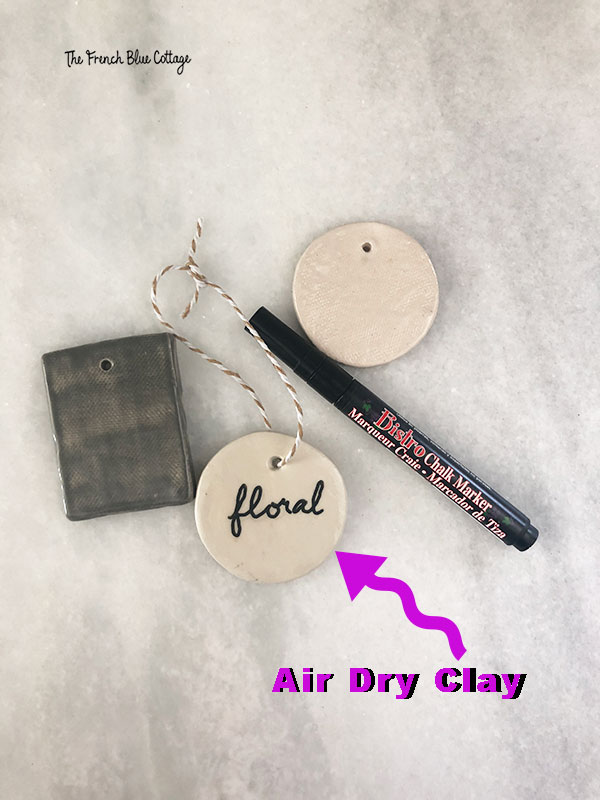
So, I thought I’d try to make some clay tags at home that would not require firing in a kiln.
My idea: air-dry clay…..
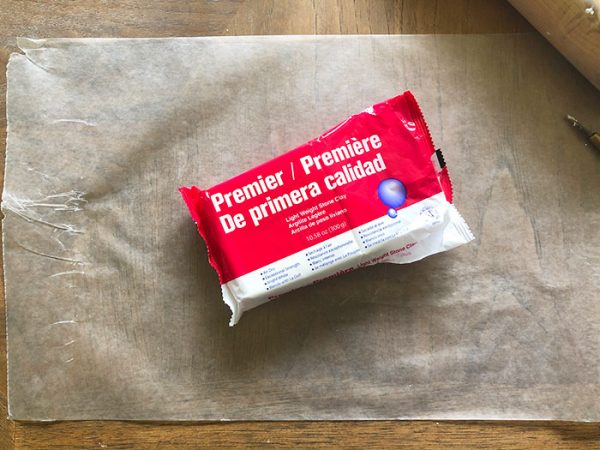
This was the first time I had used air-dry clay and it was surprisingly easy to work with.

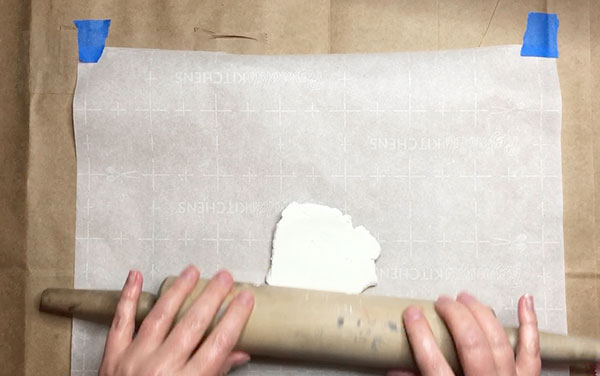
Roll out the clay
Pull off a section of the clay and knead it just a bit in your hand to soften and combine it. Roll it out to an even thickness (I rolled mine out about 1/4 inch thick). I have an old rolling pin that I picked up at an estate sale that I only use for clay…obviously you wouldn’t want to use your regular rolling pin. This clay is so soft, you could also use a cup or even a child’s play-doh roller.

Cut and smooth the clay
Cut out the tag. Find a circle that is a smidge bigger than the size you want your tags to end up. I used a lid that was about 1/8 inch bigger than the size I wanted the finished tag to be because the clay shrinks a little bit as it dries. I used a clay tool, but you can use a utility knife or something else with a sharp edge.
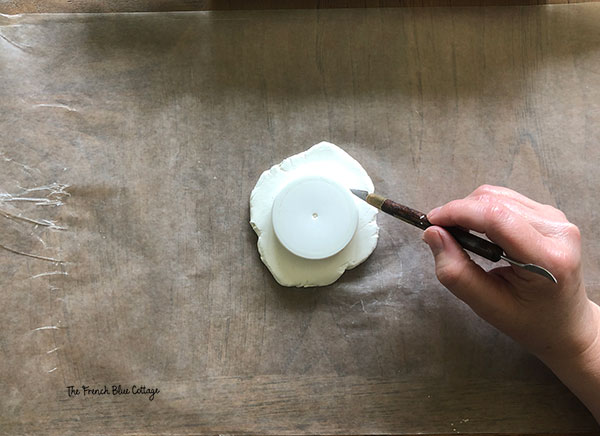
Then use a straw to poke a hole in the top center of the air dry clay tag so that you can hang it later.
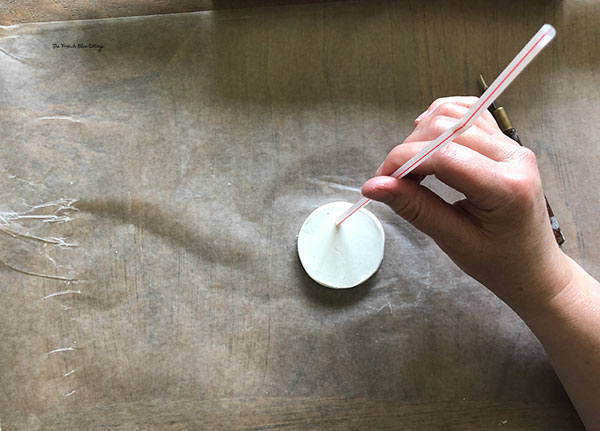
Use your fingers to gently smooth the edges. It doesn’t have to be perfect though, because we will fix the imperfections a bit later.

Dry the clay
Ok, I know it’s called air-dry clay, but I’m too impatient to just let the air dry it out. So, I sped up the process by baking my clay tags in the oven for a bit. First, put them on a couple of pieces of parchment paper layered on a cookie sheet. Place the pan into a cold oven.
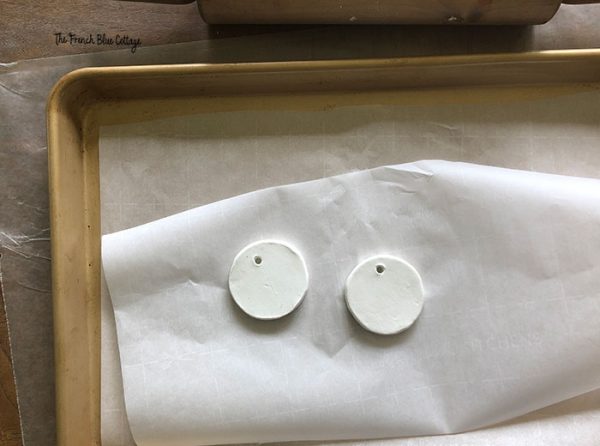
Next, turn the oven on 200 degrees and bake for 10 minutes. Then, turn the tags over and bake for 10 more minutes. This just gives them a bit of a head start because you still need to air dry them for at least 24 hours afterwards. Be sure your tags are completely dry before you move on to the next step. You will know they are dry when they don’t feel cool at all, are very light weight, and don’t have any “give” to them.
*I have read that putting air dry clay in the oven to speed drying can cause cracks. I did not experience this with any of my tags…and I made a bunch of them for this tutorial. Just to be safe, or if you are using a different brand of clay, you might want to try one as a sample.

Sand and paint the tags
Once the tags are completely dry, use a fine or medium-fine grit sanding block or a sheet of sandpaper to gently smooth out the faces until they are fairly flat. I accidentally left a couple of mine with a bit of a raised edge and it made it step 5 a bit more difficult. So, I’d suggest that you sand them pretty flat. Some of my tags were a little misshapen, so I also used the sanding block to smooth the edges into a more circular shape.
Next, paint the tags with craft paint or chalk paint. I couldn’t find a craft paint in my stash that was the color I wanted, so I used Dixie Belle chalk paint in the color Drop Cloth. I painted the front, back, and the sides.

Add a gloss coat to the air dry clay tags
Finally, you need to add a gloss coat to the tags (once the paint is completely dry). I tried several methods for getting a glossy finish to these tags. Here’s what I found to work the best for me….
Apply spray gloss or a paintable gloss to the back of the tag and allow to dry. Then put painter’s tape on the back. Cut the tape so that it is flush and not hanging past the edge of the circle. Use a straight pin to poke a hole in the tape through the hanging hole on the tag.
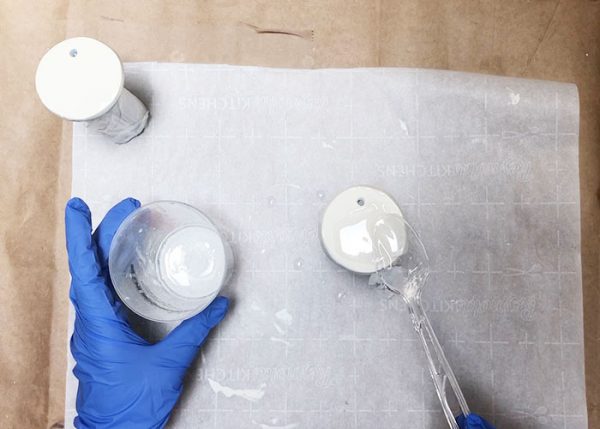
Find something you can put the tags on top of in order to pour on the gloss coat. I wrapped a few bottles of craft paint with plastic wrap and set the tags carefully on top.
To get a glossy finish that can be wiped off and reused, the only material I found to work was resin. This is the resin that I used, which calls for an exact 1:1 ratio of resin to hardener. But you can choose another resin if you prefer. Just follow whatever directions there are on the resin of your choice. Mix up some resin and coat the edges and the tops of the tags (I used the spoon that I stirred the resin with to apply it).
Resin is not cheap, but the tags won’t take very much and you can always use the resin later for creating art, coasters, or other crafts.
If you’ve seen resin art before, then you might have seen artists use a small blow torch or cooking torch to get rid of the bubbles in their artwork. But for tags of this small size, you won’t need to use a blow torch. Whew! For these little tags, you just need to use a straw to blow the resin around and to pop any resin bubbles. You still may end up with some tiny bubbles, but they are really not noticeable.
This is where you will be happy that you sanded the tags very flat. If you leave a lip around the edge, the resin will pool in the center and will not leave as smooth of a surface for you to write on later.
After you apply the resin, use the straight pin to go around the underside edges and inside the hanging hole to help wipe off some of the resin drips. You might have to do this a time or two.
Allow the resin to dry for 24 hours and then remove the tape from the back.
*Optional: If you don’t need your tags to be wipeable and reusable, I would suggest using this gloss medium or this gloss glaze to get a glossy finish instead of the resin. These materials are much cheaper and easier to apply than resin, but the chalk markers do not wipe off as cleanly. I tried it and mine ended up having a dark haze on them after a few tries.

Label the tags, wipe off, and reuse!
Use a chalk marker to label your tags.
Once the writing has dried, you can tie them or wire them to your baskets. The resin will make the chalk marker labels erasable with any dry cloth. This way, you can reorganize to your heart’s content later and your DIY tags will be reusable.
Since I have made both kiln-fired and air-dried clay tags, I thought I’d reflect a bit on the differences:
Differences between air dry clay tags and kiln fired clay tags:
Time: The air dry clay tags require more hands-on time to complete. But the kiln-fired tags require more time over all. They must dry longer before you can fire them and you have to drive back and forth to the ceramic store (unless you have a kiln at home, of course) and also wait between the two firings.
Feel: The kiln-fired tags win this one because they are heavier and feel much more substantial. If I was going to use the tags in a main living area in my home, I might opt for the kiln-fired ones.
Cost: The air dry and kiln-fired tags are probably about equal in cost. The resin is not cheap for the air-dry tags. But once you factor in the clay, glaze, firings, and driving to the ceramic shop for the others, the two kinds are probably not much different in price.
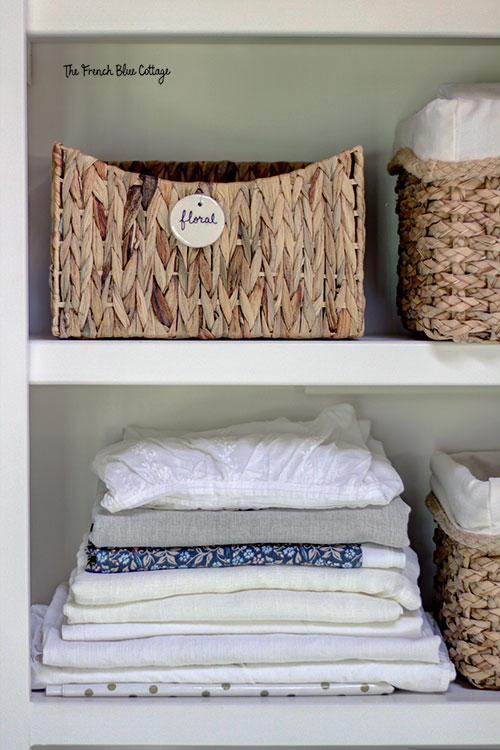
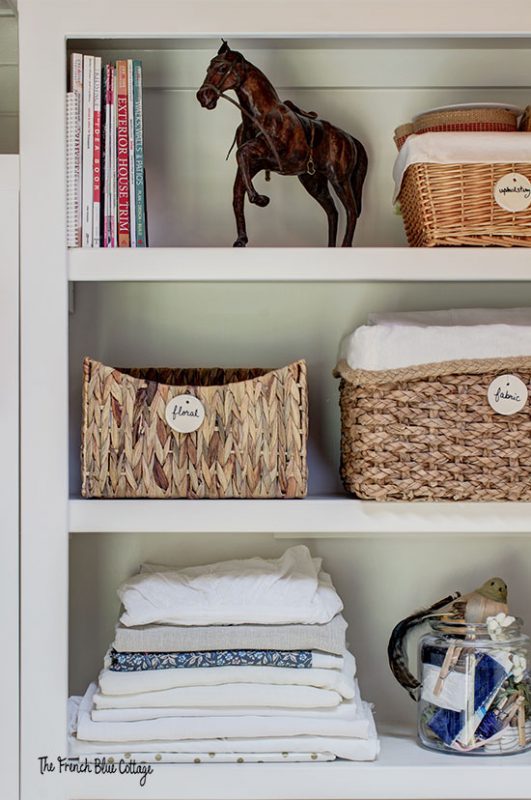
I’m very happy with how my air-dry clay tags turned out. They make the organization on my shelves much prettier and much more convenient!
![]()
Check out this video that shows the whole process of making these air dry clay tags….
![]()
My shelves in the new studio may not stay exactly like this.
I’m not sure I’m done styling them, but here’s how they look for now…

Art and Crafting Studio To-do List:
paint walls and (possibly) ceiling (decided against painting the ceiling)paint colorful, stenciled concrete floorre-paint desk areaaddress lighting and ceiling fan (give it a DIY makeover!)order window shade(install shade)find and buy a pine table(refinishing pine table)figure out storage needs, buy baskets that fit, & then organize- buy office chair (I’ve decided to recover one I already have)
decide on a rug (I love the floor so much, that I’m not adding a rug!)- make art ledges
- make open shelves
get new cabinet hardware- cover plastic storage drawers
- figure out oil paint storage
- decor items

I love how your tags look on your baskets! Using resin is such a great idea so that you can use them for years to come and be able to easily change what is written on the tags. This is also a great gift idea!
Thanks, Paula! I love using resin for lots of things:) What a good idea to give them as a gift….or even use them as a gift tag.
Those are so cool. I always love using little tags like that for items in our pantry and linen closet.
Thanks, Sonya:) Good idea to use them in the pantry!
These are so lovely… and I love the different options you share for making the clay tags. We used two part resin in my parents’ nursery lamp business… we always used a torch! 😉
Thanks, Julie! Yes, I’ve made some resin art in the past and always used a torch on those pieces. I think it sounds scarier than it actually is:)
I’ve never used air dry clay before…thanks for the excellent tutorial! I love how the tags are both stylish and functional. They look great in your arts and craft room. I could see using this clay to make Christmas ornaments. Pinned!
It was my first time to use air-dry clay too. Love your idea about Christmas ornaments!