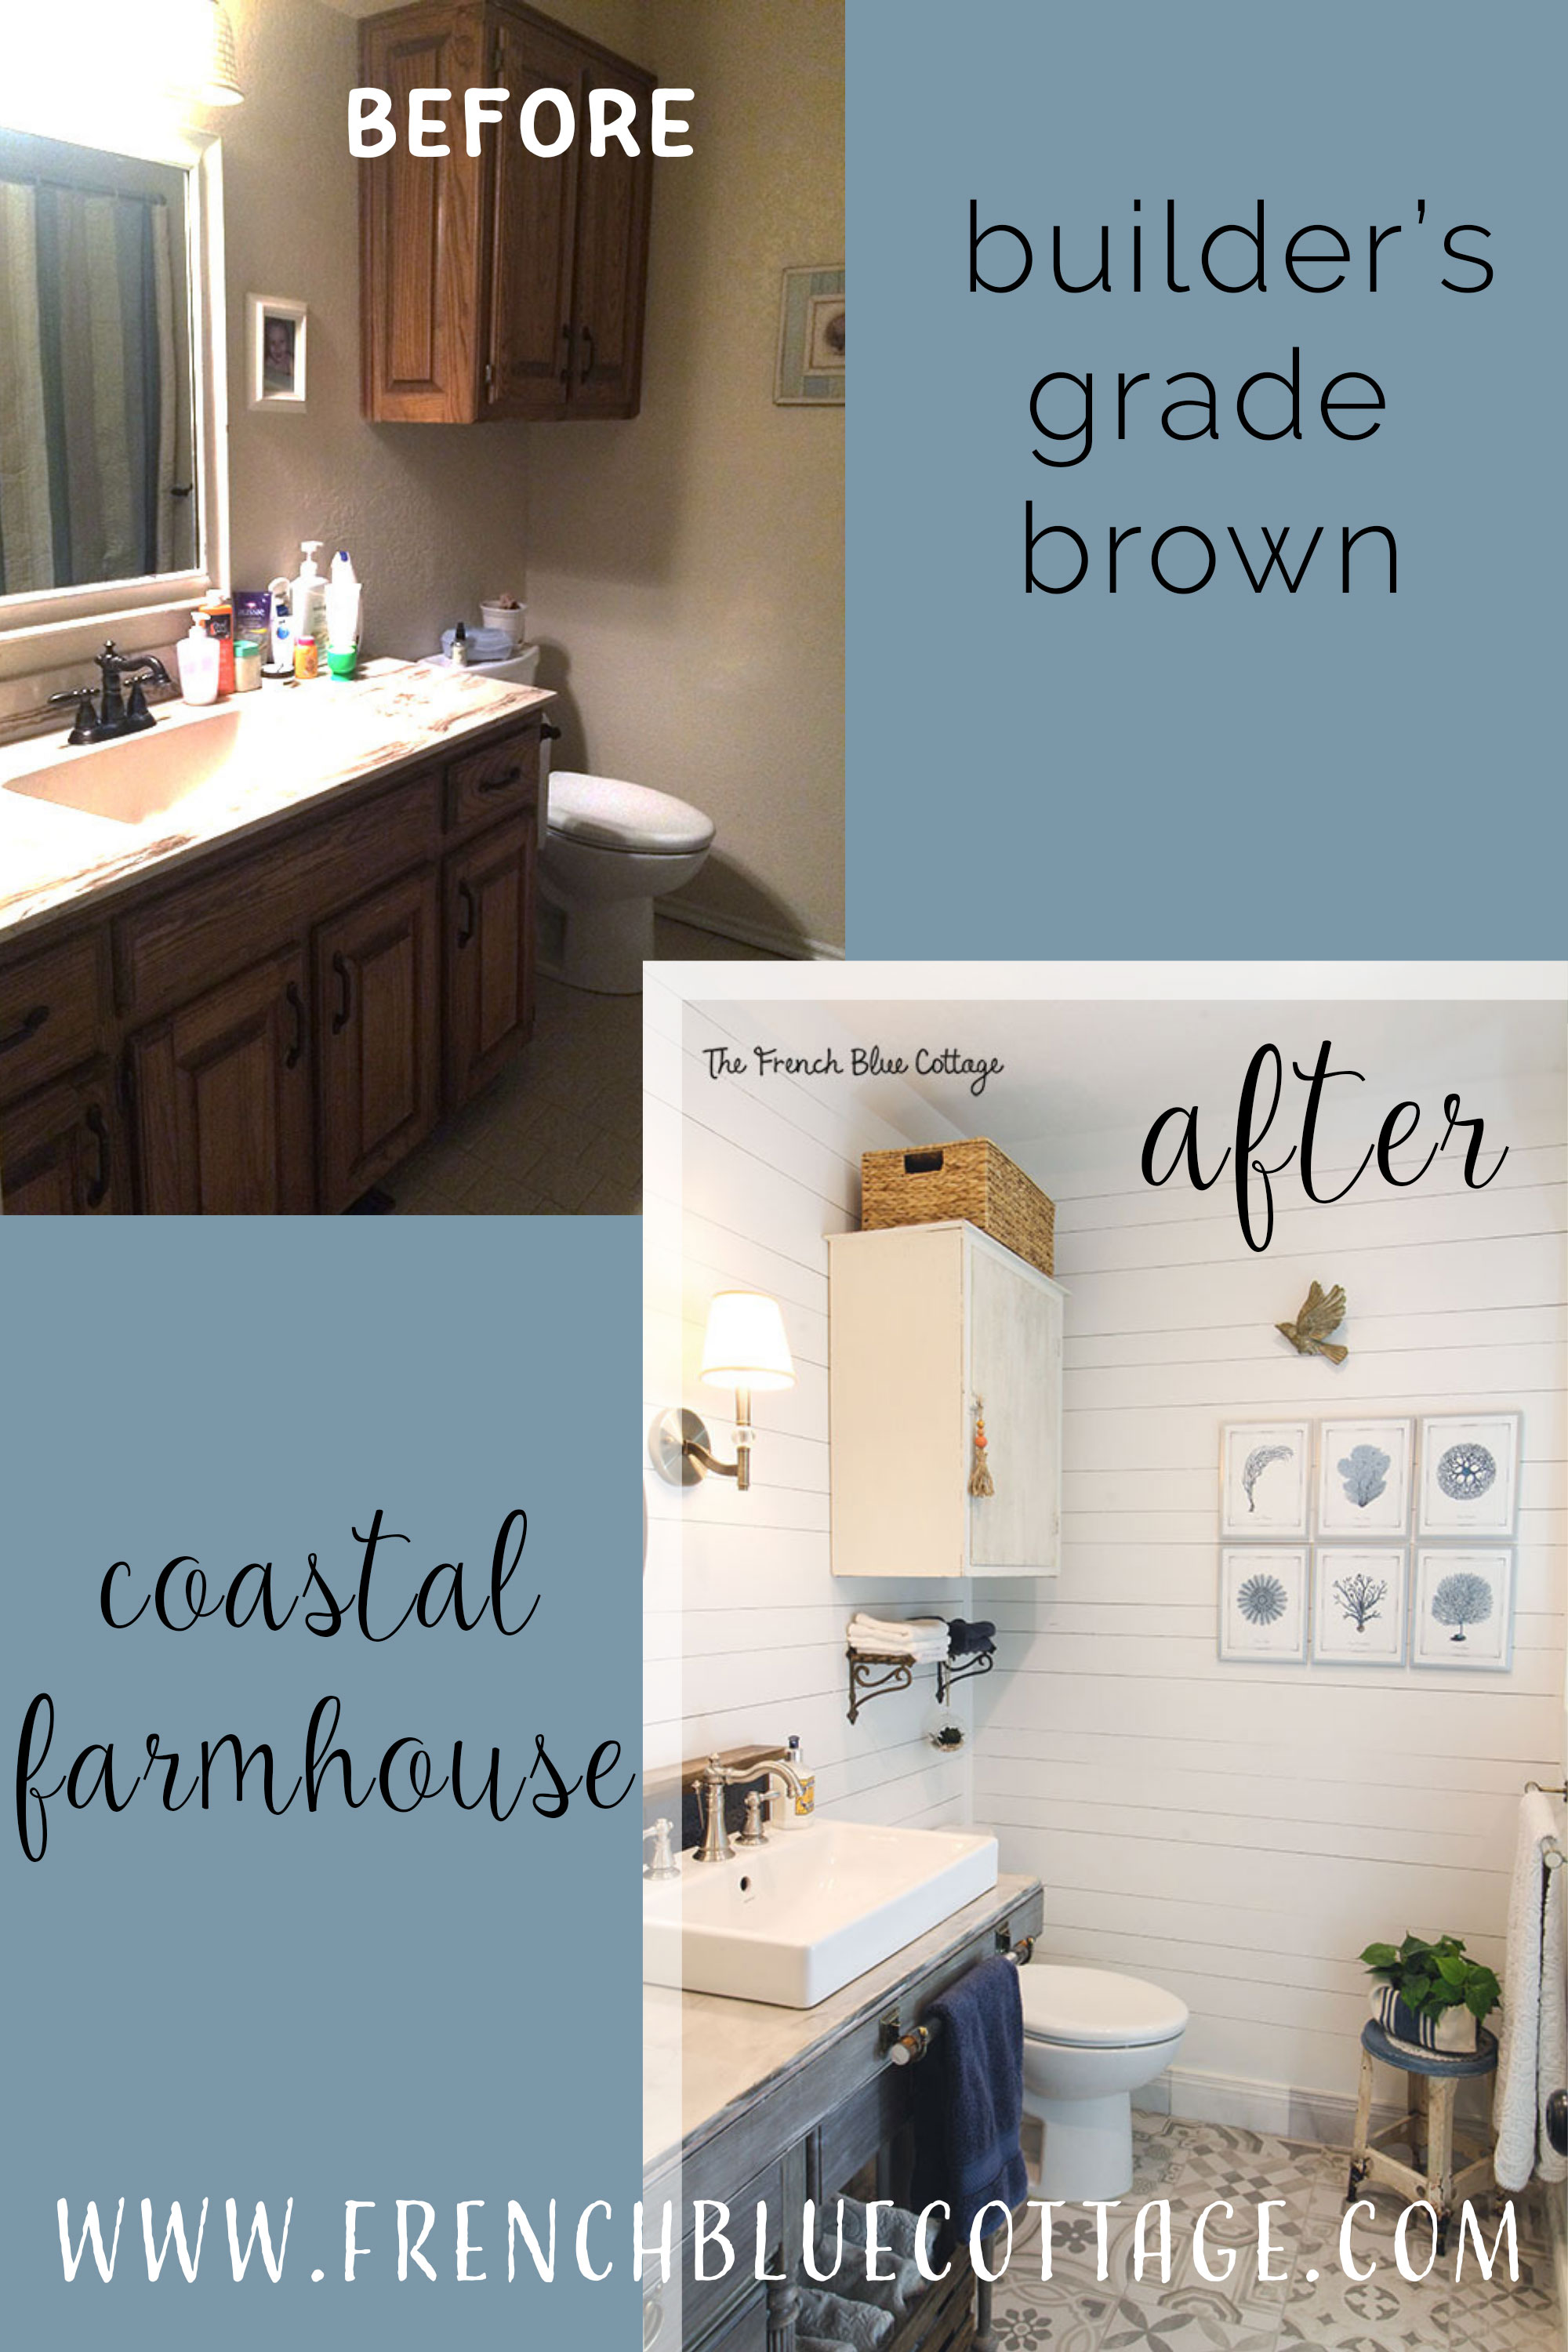
A Coastal Farmhouse Bathroom Remodel
Are you ready to see the second half of this coastal farmhouse bathroom remodel?
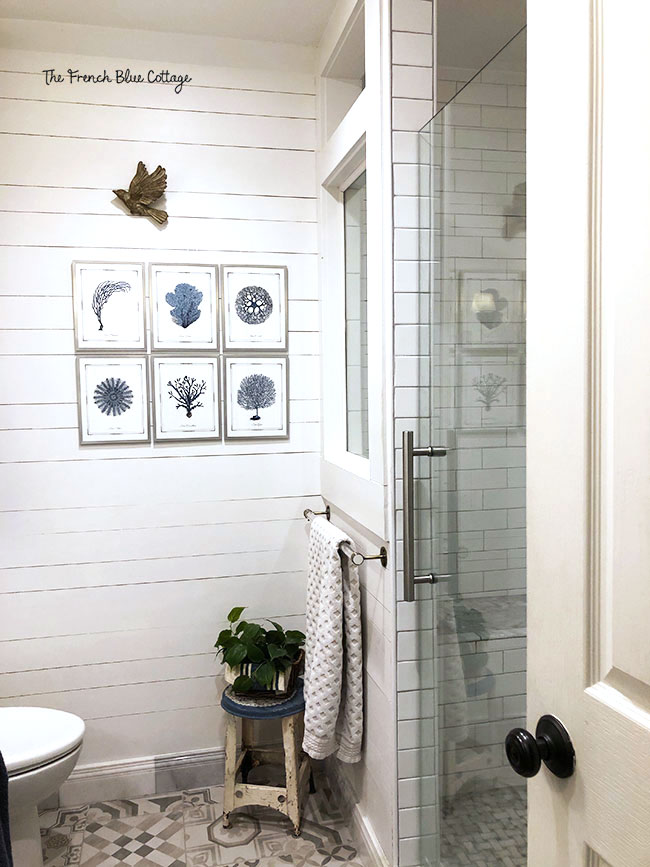
Here’s a reminder of what the shower side looks like. Previously, there was a bathtub here…
Click here to see the first part of the remodel.

*Some affiliate links used below.
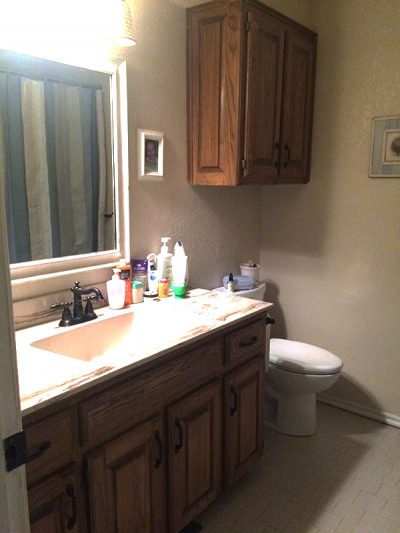
Now here is what the other half of the bathroom started out like…..
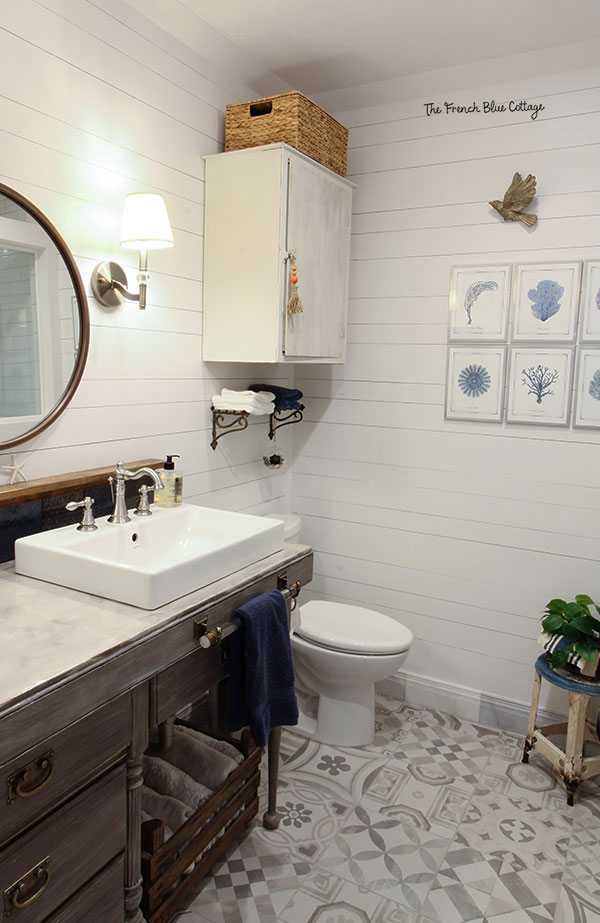
And here is the same view now…
This is definitely a change from my typical French Country style. But this bathroom is in the center of the house and has no natural light. It really needed to lighten up!
How we achieved the coastal farmhouse look:
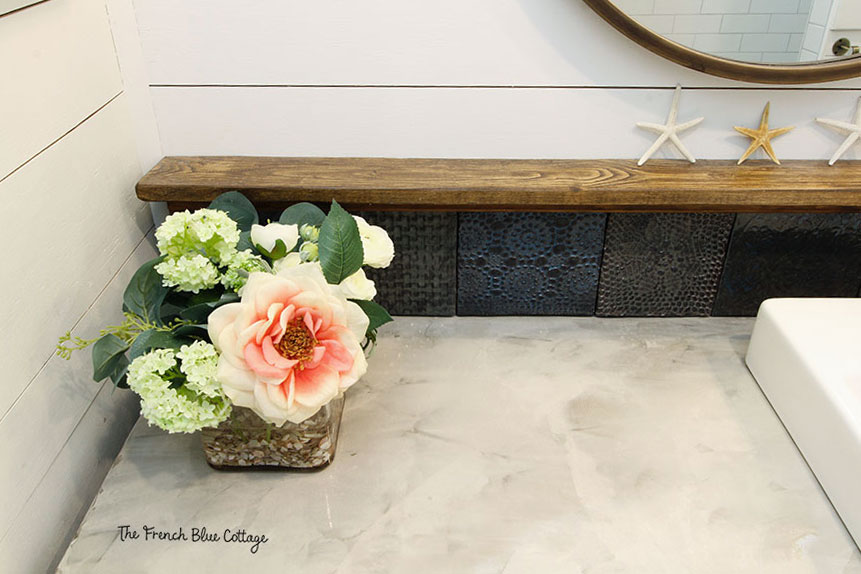
One of the biggest changes in the bathroom, was the addition of faux shiplap, painted white. I wanted a slightly different look than the traditional shiplap, so I had the carpenter cut them in various sizes. They are in 3″, 4″, and 6″ widths. The walls are painted with the color ‘Alabaster’ from Sherwin Williams.
We also took out the bulkhead above the cabinet and then replaced the cabinet itself. I bought this at an antique store and then gave it an old, chippy paint finish….
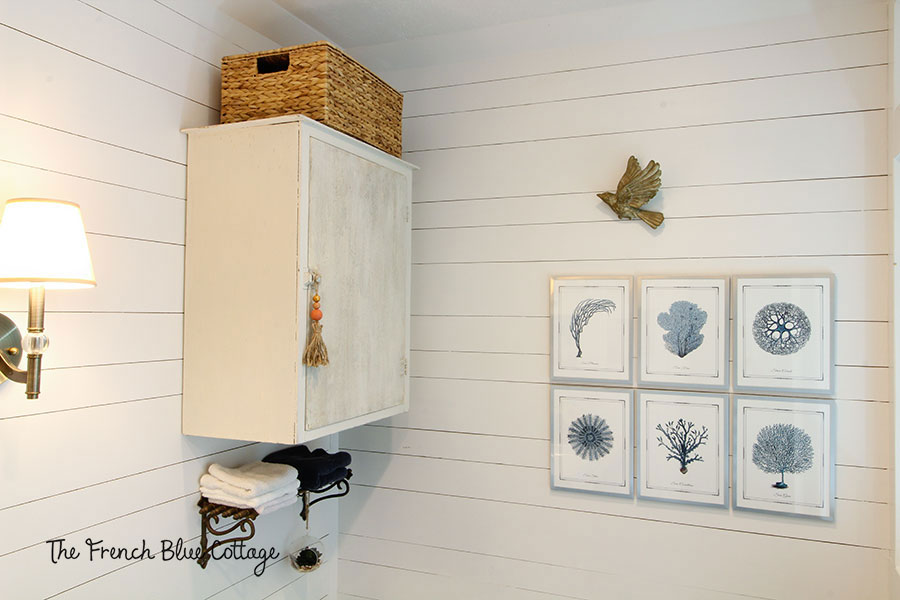
Here’s a close up of the paint finish…
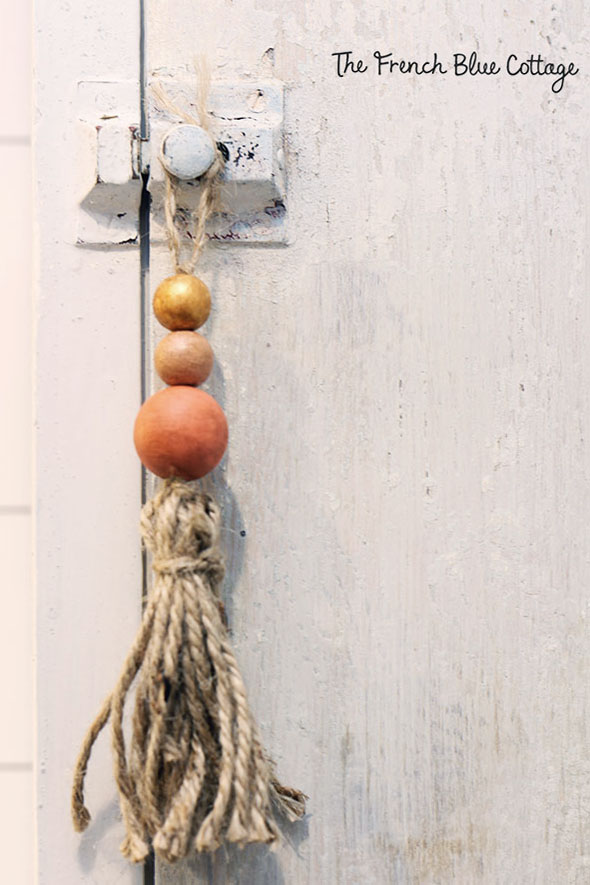
I love this old hardware!
And I decided to make a wood bead and twine tassel to hang from the cabinet lock in order to bring a little color and interest to this side of the bathroom…
A brass train rack shelf that I bought at an estate sale, holds towels and washcloths…
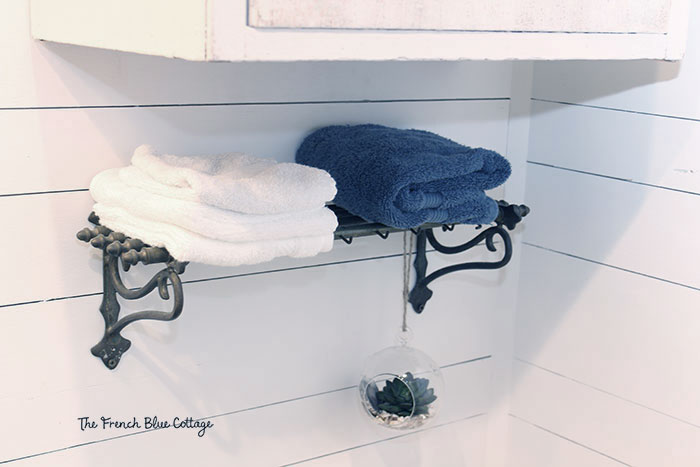
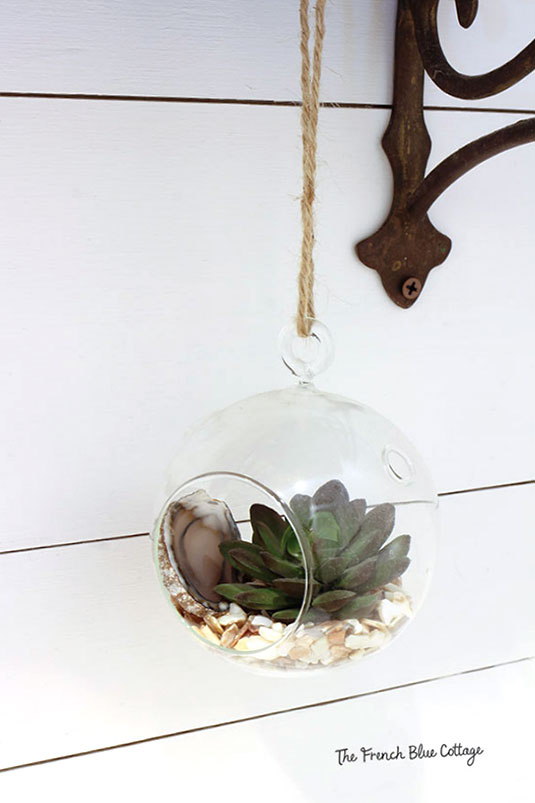
I also made a mini hanging terrarium with a faux succulent, some crushed shells, and an agate slice and hung it from the shelf….
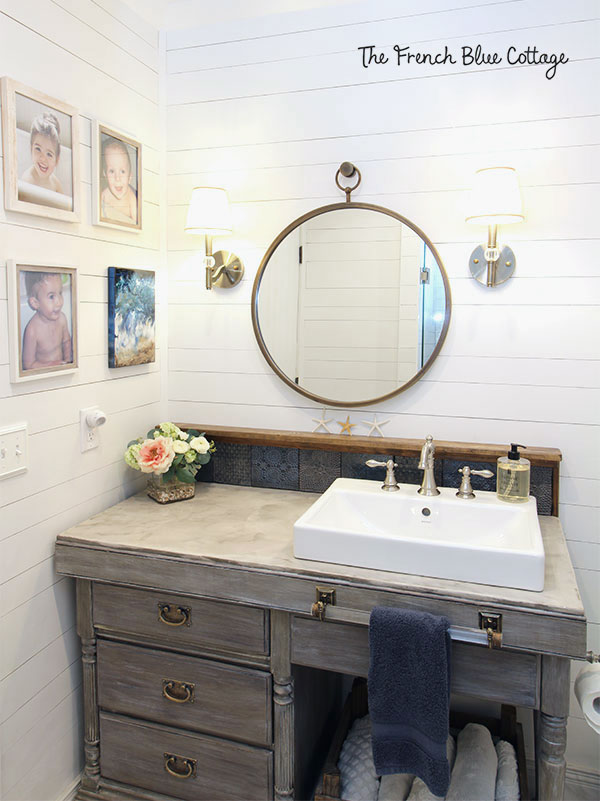
Vanity area:
If you turn towards the door, you can see the vanity, mirror, and artwork.
And speaking of artwork, how about using one of your baby’s bathtub photos as bathroom art. Two of my “babies” are in their teens now, but I love these sweet little memories!
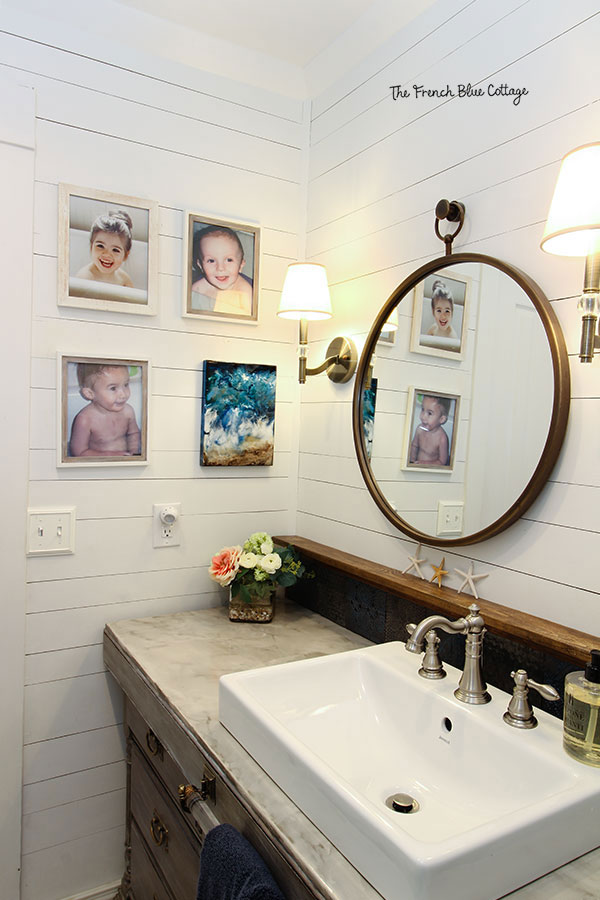
I chose a round mirror and aged brass sconces with linen shades.
The vanity is a writing desk that I refinished in a driftwood gray. The desk wasn’t quite tall enough, so I had a carpenter construct and add a larger top…
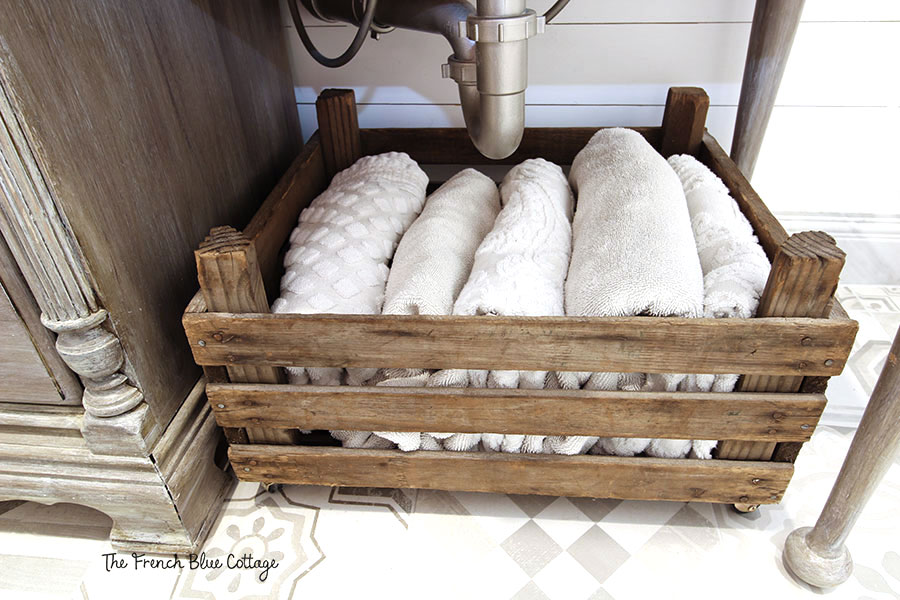
Our towels are stored underneath the vanity. Also, I spray painted the white plastic pipe to make it a bit more presentable:)
For storage, I took a vintage crate and put casters on the bottom…
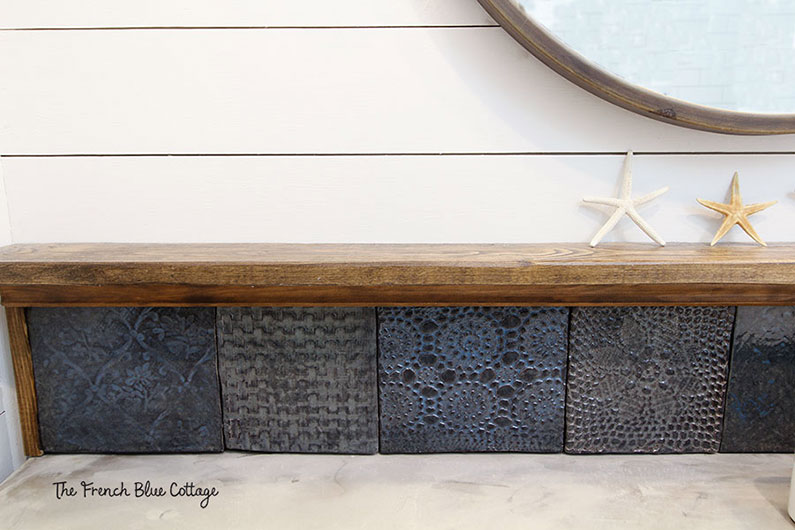
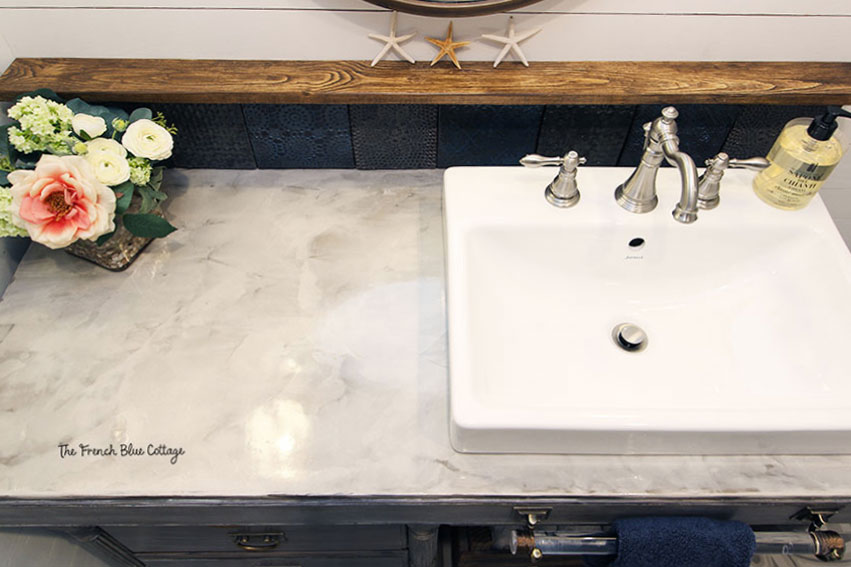
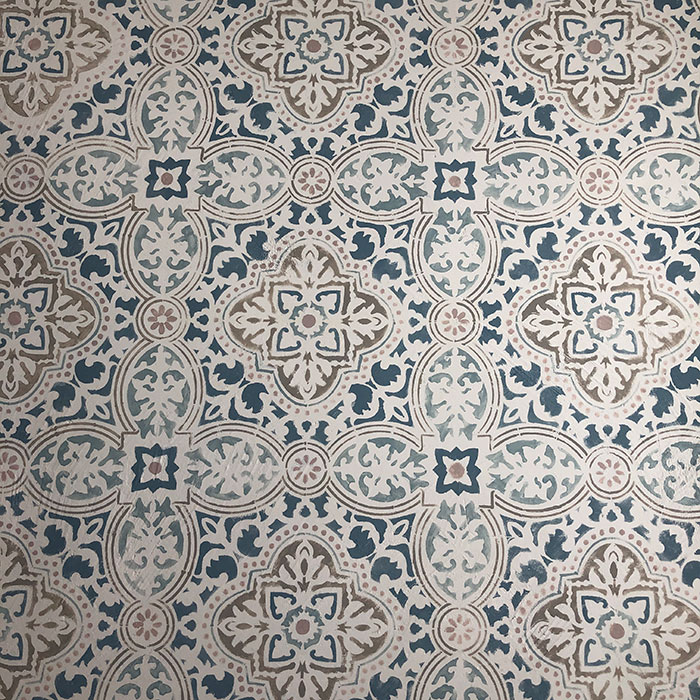
The backsplash and countertop:
Maybe you noticed the backsplash above? These are handmade tiles that I made myself!
I went to my local pottery shop and purchased clay, cut out the squares, and added texture. Then I had them fired, glazed, and fired again at the clay shop.
I’d be happy to write full a tutorial on how I made them if you’d like….
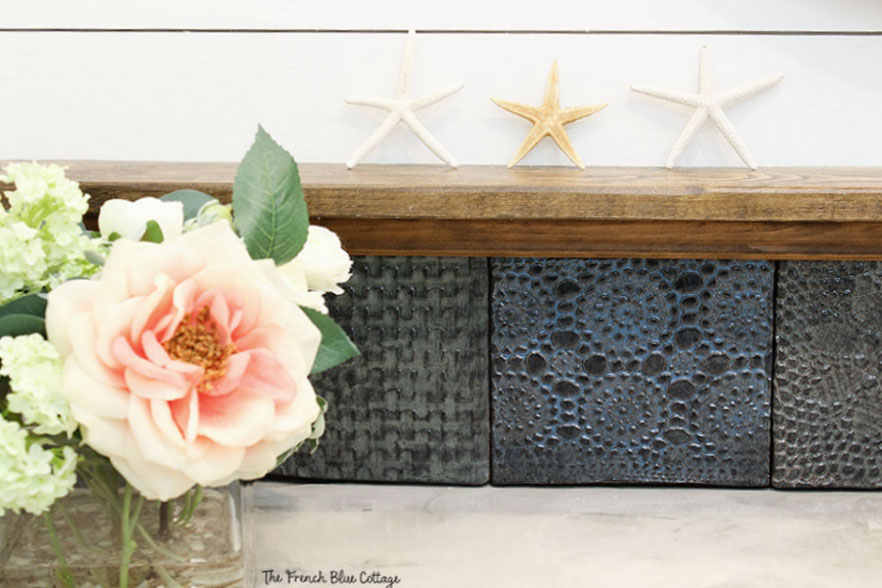
The countertop is a piece of cement board with troweled on layers of Ardex Feather Finish. I used both the white and the gray Feather Finish. Then I coated it with a sealer from a local concrete shop.
This is the one thing that didn’t quite turn out as planned. When I troweled on the feather finish, the white really showed through and made the whole thing very marble-like. But after the sealer was applied, it really darkened. I still like it though, but next time I might experiment with a different sealer. I will say that the countertops have held up wonderfully, so maybe it was the right sealer after all!
Resin art:
Did you see the other art that is next to my babies’ bathtub photos?
I made this piece of resin art (some people call it “pour art”). This was my first attempt and now I’m hooked! It was so much fun and I’ve actually made a couple more resin pieces since this one. (This is another project that I can make a detailed tutorial or a video about if it’s requested.)
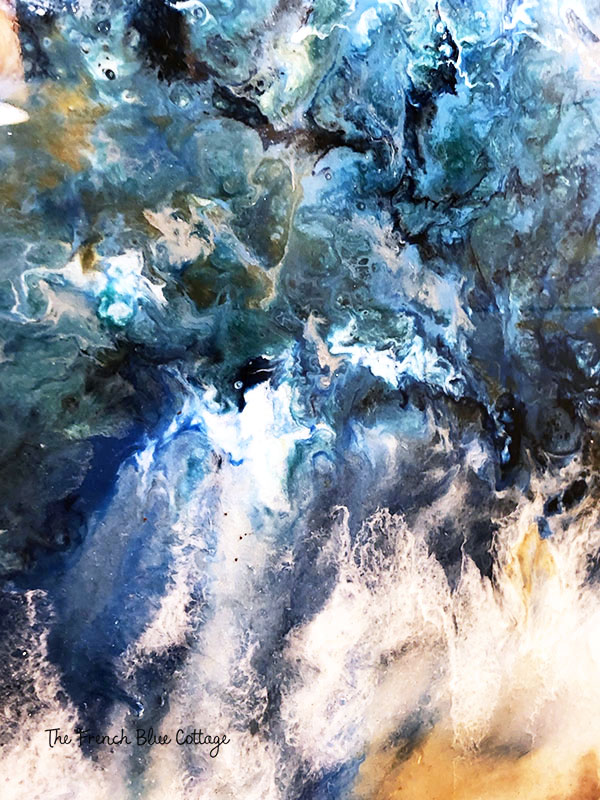
Since I was going for a coastal vibe, I chose to make an ocean-inspired piece of resin art….
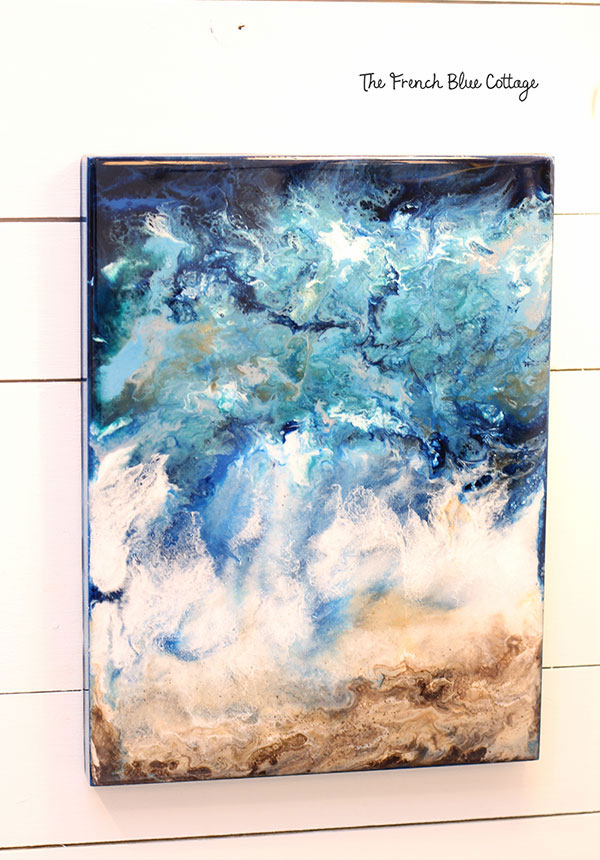
Here’s a couple of close-ups of my art piece….

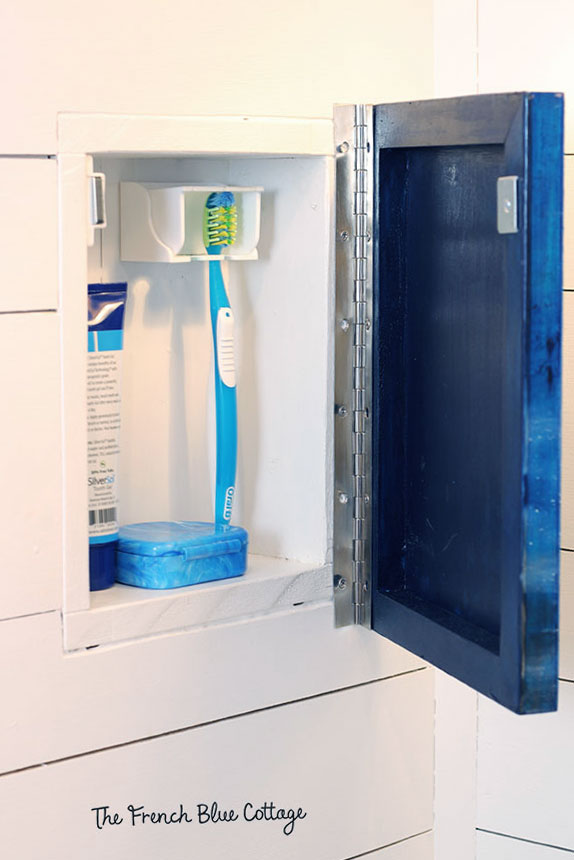
And, as an added bonus, there is something hiding behind this art….
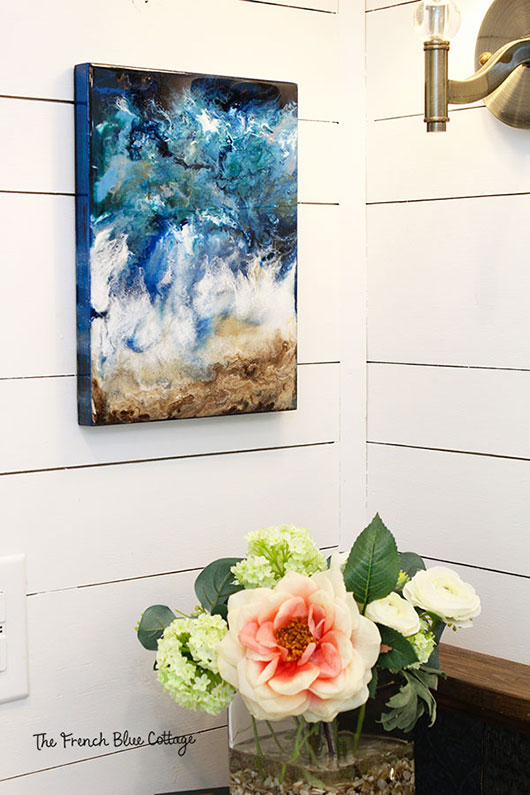
A little niche that was built between the studs!
We attached it with a piano hinge and added a magnetic cabinet latch to keep it from swinging open.
I knew that we’d be touching the artwork in order to open it, which is why I chose resin art. When I made it, I allowed the resin to coat the sides of the frame as well, so that it’s completely cleanable.
We’re using it for the kids’ toothbrushes and toothpaste….
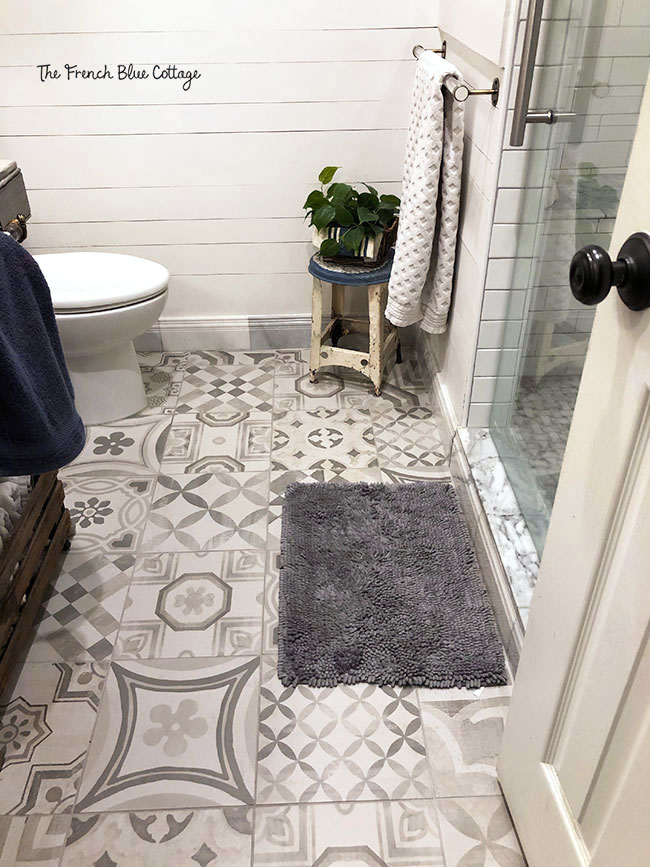
And finally, one of my favorite parts of this coastal farmhouse bathroom is the floor.
I chose this porcelain tile in a patchwork pattern…
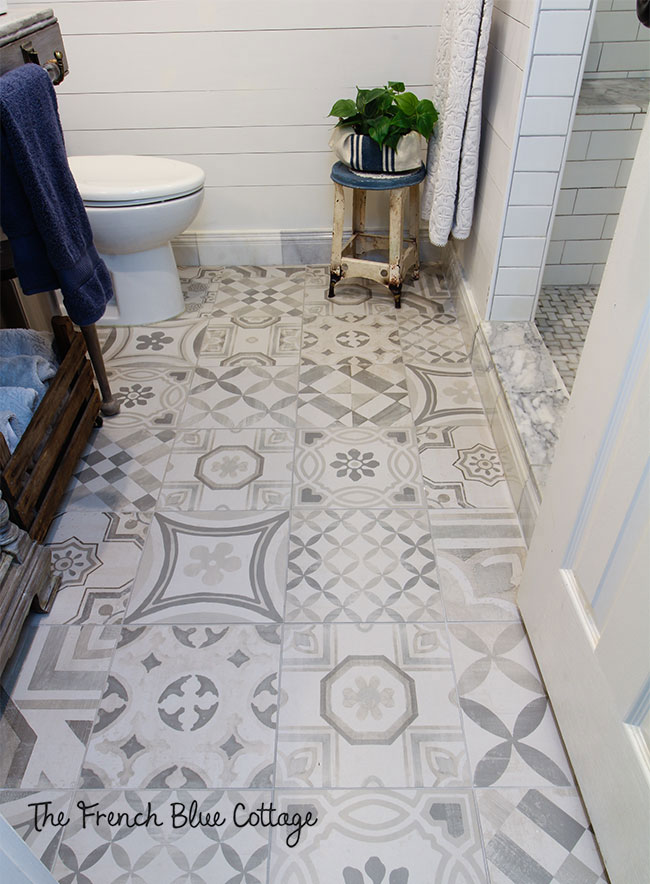
I’ve long admired cement or encaustic patterned tiles, but they are quite expensive.
I bought these at a local tile store (the tile is called Cementine Cold and they are made by Keope). They weren’t cheap either, but definitely cost less than the similar cement tiles I found.
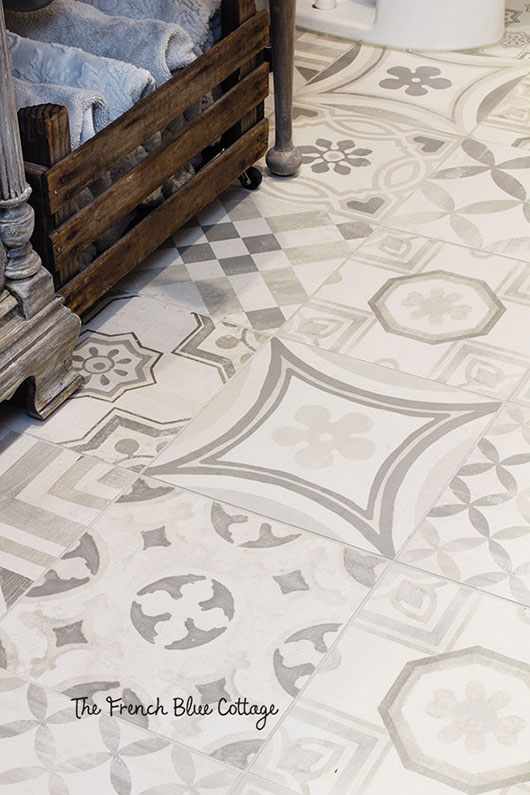
The marble baseboards were intended to be used in the shower, but they didn’t work there. I think I like them even more as the room’s actual baseboards…
Whew! That was a lot of photos!
Here’s a list of some of the products and materials we used:
paint (Alabaster – by Sherwin Williams)
wall cabinet (antique store)
brass train shelf (estate sale)
crushed shells – similar here
faux succulent – (Hobby Lobby)
agate slice – similar here
picture frames (Michael’s)
round mirror (World Market, but no longer available)
vanity (antique store)
towel bar hardware (antique brass finish no longer available)
towel crate casters – (Lowe’s)
sculpted towels (World Market)
backsplash tile (handmade)
countertop (white feather finish and gray feather finish)
sink (Lowe’s – Jacuzzi Anna Farmhouse sink)
birch art board (similar here)
piano hinge for artwork (Lowe’s – similar here)
magnetic cabinet latch (similar here)
floor tile (local tile store) (Cementine Cold by Keope)
marble baseboard (The Tile Shop – similar here)
I hope you enjoyed taking a peek inside our coastal farmhouse bathroom remodel and maybe even found an idea or two you could use in one of your own rooms.
Let me know if you have any questions or if you’d like a tutorial on any of the things I made for this room makeover.

Related: See the first part of the bathroom makeover here.

Carrie, this looks amazing. Love all the details, from the kid’s framed photos to the wall cabinet, the crate with casters, and your backsplash, just to name a few!! The floor feature is what caught my eye on Rebecca’s CYS party, but I love it all. Yes, I’d love to see a tutorial on the resin art. Did you notice, btw, there appears to be an animal face in the art, L of center, just before where while goes into the dark blue? Looks like a goat or llama. Can you see it?! Great job on the entire project!
Hi, Rita! Thank you so much for your kind comments! After you said that about the animal in my art, I had to go look at the art itself and couldn’t find it. But then I looked back at the photos of it from my blog post and now I do see it! It looks like a sweet giraffe to me:)
Actually, there is a horse running out of the water on the bottom left. Perfect horse in action, complete with its let bent forward and up next to its head , which looks just like horses when the run. You couldnt have made a perfect horse on the beach art work.
Wow…..my spelling today!…or typing. The horse has a bent LEG and THEY run. Lol. Apologies.
I knew what you meant?
Oh, I wish I could see it! I feel like I’m looking at an inkblot test and not seeing what everyone else sees:) It’s funny how art does that some times!
Carrie, You did an amazing job with your bathroom remodel! I love everything about it! Congratulations, you were featured this week at Celebrate Your Story! Thanks so much for sharing 🙂
Thank you, Rebecca! And I’m so excited to be featured!!
Just curious how much the shower cost to do?
Hi Sarah:) Unfortunately, I didn’t keep track of the exact expenditures very well. I know the door was the most expensive part of the shower and was somewhere in the neighborhood of $500 or so. The subway tile, the tile on the floor, and the tempered glass window were not very costly. We also did not have to move any plumbing, so we only had to pay for the construction and tiling. Sorry, I know that’s not much help…I just can’t remember. ?