Craigslist Table and Some Staining Tips
As part of our dining room remodel, we bought a “new” formal dining room set. In actuality, it was a Craigslist purchase. I was going for a certain look and could not find anything new that was both the style I liked and in a price I could live with. So, like any good DIY’er, I headed to Craigslist and found a set there.
It came with the table and 6 chairs plus a china cabinet and I got it for a steal.
The first thing I did was to paint a few areas with some regular Elmer’s School Glue. I just put a little on in random places to hopefully get some crackling.
Then, I painted the sides of the table and the pedestal bases with Miss Mustard Seed Milk Paint in the color Linen in about a 1 to 1 ratio (1 part dry milk paint to 1 part water).
I made sure not to get the paint into the grooves. By leaving the grooves brown, it enhanced the carved details.

If you aren’t familiar with this paint, it comes in beautiful, neutral colors and will often create a “chippy” finish.

It is also quite thin and runny and I decided to apply three coats. After it dried, I used a sanding block to lightly distress and help the chipping along. Can you see the bit of crackle in the detail picture below? That’s from the Elmer’s glue!

At this point, you could use a clear or dark wax or a polyurethane. But I wanted a warmer white color, so I used a glaze that I already had on hand to tone the table. I just brushed the glaze on and wiped it right back off to leave just a little color.
I have not put on a top coat yet, but may decide later to put on a clear wax or a coat of water-based varnish. I really do need to because I don’t want the paint to continue chipping off.
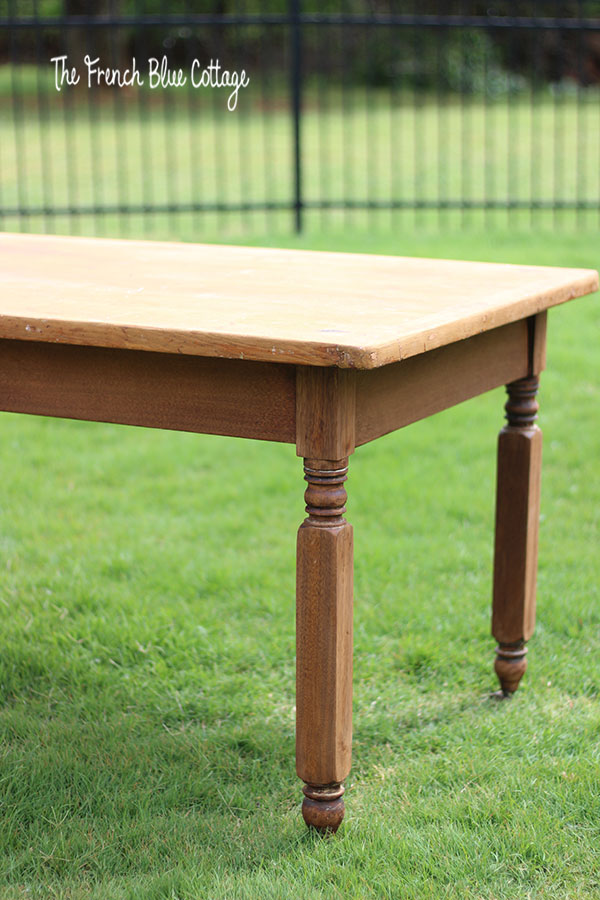
This part of the project went exactly as planned. Unfortunately, my DIY good luck stopped here! It was now time to refinish the table top.
Long story short, I stripped the table top and the leaves didn’t match the rest of the table. So, I had the bleach them.
Now I usually (actually more like always) use water-based products. But I found out that Minwax had a new color called Classic Gray and it only came in an oil base. So I decided to use that (combined with their color Special Walnut). I applied it and the color was very nice, but it seemed to not be absorbing into the table. Uh oh! It remained tacky for many so I let it set up overnight. The next day, it was dry to the touch, but I could tell that the stain was more or less sitting on the top of the surface. So, I sanded the whole thing off….. again.
I am now starting to hate this table!
At this point, our contractor stopped by to check the progress of the remodel and looked underneath the table top. He said “the problem is that the table top is not solid wood, but it’s wood with a veneer layer”.
Duh!
At this point, I pulled out the trusty water-based product I use called Stain and Seal by Faux Effects and it went on beautifully.

I then applied a coat of Varnish Plus Satin, also by Faux Effects. I hit this with super fine steel wool and then waxed the top with a coat of Annie Sloan Clear wax.
I love how this table turned out, but it was a real bear to get it finished properly!

Here are some tips so that you can learn from my mistakes:
1. Make sure that the surface you are staining is solid wood before using an oil-based stain.
2. Two different tones of wood, will most likely look different even after you have applied stain. It’s best to do a sample, if possible, or bleach the wood to get them more even.
3. Oil-based products need to soak into the wood. If it’s not soaking in right away, it’s probably not going to.
Later this week, I’ll post the dining chair re-do. They were much easier!